
If you’ve been in the security industry for a while, you know the feeling. You walk into a residential or commercial property, and there it is: a DSC PowerSeries panel (PC1555, PC1555 MX, PC1575, PC5010 (832), PC5020 (864), PC1616, PC1832, PC1864). It’s 12 years old, covered in a bit of dust, but completely bulletproof. The hardwired zones are solid, the sirens work perfectly, and the customer doesn’t really want to pay thousands of dollars to tear everything down just to get a modern smartphone app.
Up until now, your options as an installer were limited. You could pitch an expensive “rip and replace” job, or you could install a bulky internet module that forces you to run an Ethernet cable all the way from the main panel to the client’s router. Let’s be honest: nobody likes drilling through drywall or fishing CAT5 cables through a finished house just to get an old panel online.
That is exactly why we engineered the iLinq DSC.
The Wi-Fi Shortcut Your Toolbox Is Missing
The iLinq DSC was born out of a very simple frustration: Why should upgrading a reliable, hardwired panel be a headache?
Instead of dealing with Ethernet cables or expensive cellular contracts, the iLinq DSC connects directly to the panel’s KeyBus and bridges it instantly to the local Wi-Fi network.
Here is what makes it a game-changer for independent installers and security integrators worldwide:
- Pure Wi-Fi Convenience: No network cables required. As long as the panel location has decent Wi-Fi coverage (or you can pair it with a simple extender), you are good to go.
- Full Keybus Integration: This isn’t just a basic relay trigger. The iLinq reads real-time zone data, bypasses, system faults, and arm/disarm states directly from the panel.
- The “Zero-Truck-Roll” App: Once the module is connected, your customer gets full control of their system through a polished, intuitive mobile app. They can arm, disarm, and receive instant push notifications for alarms without you having to set up complex port forwarding or dynamic DNS.
- Keep What Works: You keep the bulletproof reliability of DSC’s hardwired sensors while giving the user the 2026 smart-home experience they actually want.
Why Integrators are Shifting Away from Bulky Alternatives
Most legacy internet modules on the market feel like they were designed two decades ago. They require rigid network configurations, physical cables, or lock you into mandatory proprietary monitoring platforms that cut into your margins.
We took a different approach. The iLinq DSC is compact, power-efficient (running directly off the panel’s auxiliary power), and designed to be configured right from your phone in minutes. It turns a potential half-day labor nightmare into a quick 15-minute add-on service that you can easily monetize.
Step-by-Step Technical Installation: Wiring the iLinq to the DSC Keybus
One of the best things about the iLinq DSC is that you don’t need a degree in network engineering to hook it up. If you can wire a standard DSC keypad, you can install the iLinq module in under 5 minutes.
Before starting, always power down the panel by disconnecting both the AC transformer and the backup battery to prevent any accidental shorts.
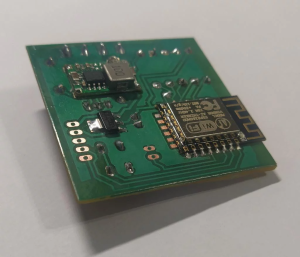
Here is exactly how to get it done:
1. The Physical Keybus Connection
The iLinq module communicates with the panel via the standard 4-wire DSC Keybus network. Inside your DSC cabinet, locate the main terminal strip and connect the module’s 4-wire terminal using standard alarm wire (22 AWG is perfect):
- RED (Aux +): Connect to the panel’s AUX (+) terminal to power the module (12VDC).
- BLK (Aux -): Connect to the panel’s AUX (-) or any COM terminal for ground.
- YEL (Yellow): Connect to the panel’s YEL terminal (Keybus Clock).
- GRN (Green): Connect to the panel’s GRN terminal (Keybus Data).
Tip: Because the iLinq is incredibly compact and has an ultra-low power draw, you can mount it directly inside the original metal DSC enclosure using double-sided foam tape. Just ensure the antenna is clear of heavy metal shielding for the best Wi-Fi reception.
2. Powering Up & Wi-Fi Provisioning
Once the wiring is secure, reconnect the backup battery and plug in the AC transformer.
- Booting Up: The iLinq module will power up and automatically broadcast its own temporary, secure setup Wi-Fi network (Hotspot mode).
- Connecting: Open your smartphone or tablet, go to your Wi-Fi settings, and connect to the iLinq network.
- Provisioning: Open your mobile browser, navigate to the setup page, and select the client’s 2.4GHz home or business Wi-Fi network. Enter the network password, and the module will instantly bridge itself to the cloud.
3. Finalizing the Panel Configuration
The iLinq reads data passively and actively from the panel just like an advanced keypad. Depending on your specific DSC PowerSeries firmware version, you may need to ensure a slot is open for a new device:
- Enter installer programming (
*8 [Installer Code]). - Go to section
[000]to check keypad/module slot assignments if necessary. - In most standard setups, the iLinq automatically self-configures and begins decoding zone data, system troubles, and partition statuses immediately upon connection.
That’s it. Pack up your tools, close the cabinet, and hand the smartphone app over to your client. You just brought a 15-year-old analog tank into the modern smart-home era.
*Also compatible with TCP/IP Ademco ContactID protocol
Stop Leaving Money on the Table
There are millions of active, unmonitored, or “forgotten” DSC panels running globally right now. Homeowners want app control, but they don’t want a massive hardware bill.
By offering the iLinq DSC upgrade, you provide an affordable, high-margin solution that solves their problem instantly—while positioning your business as the tech-savvy partner they can trust.
Do you still have any questions? Contact us.
